What is the difference between a full band and partial band bra?
The pattern for a partial band and a full band bra are not the same, meaning you cannot sew the cups from a partial band bra into the frame of a full band bra. You also can’t decide mid-sewing to change a partial band bra to a full band bra or vice versa. In both cases, a pattern alteration is necessary. The only pattern piece that is interchangeable are the straps, and that’s assuming you have fabric straps and not elastic straps (elastic straps don’t require a pattern piece).

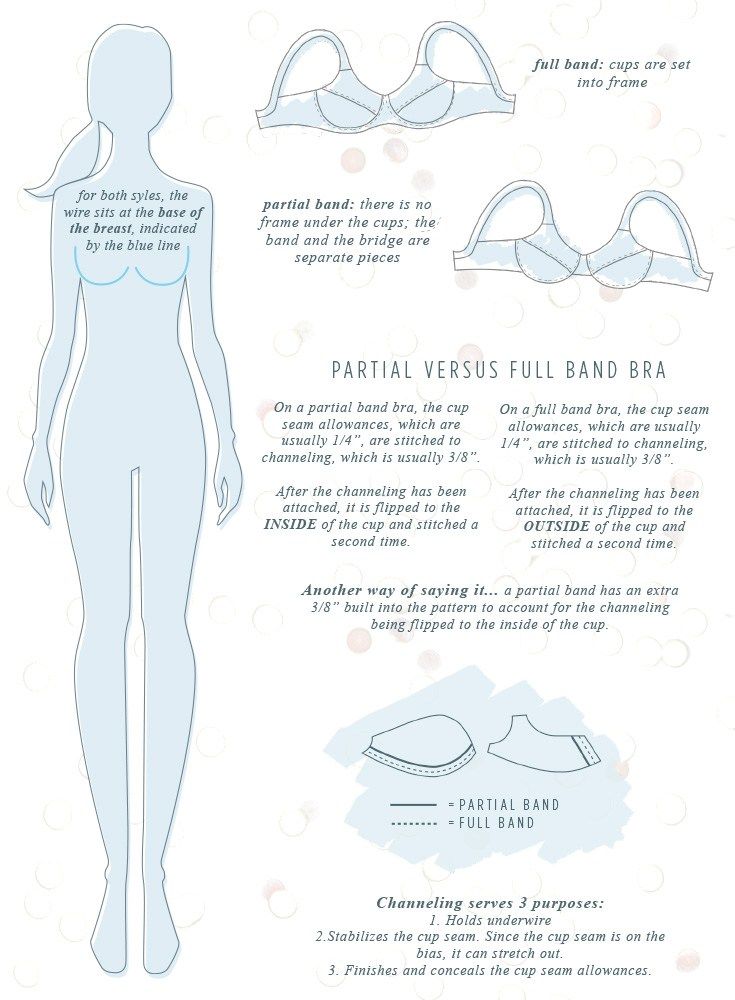
A full band bra is a bra in which the cups are sewn into a frame (left picture above), and a partial band bra is a bra in which there is no frame and the band and the bridge are separate pieces (right picture above). For both styles, the wire line sits at the base of the breast, which is indicated by the blue line in the infographic above, but the position of the cup seam is different depending on the style. Briefly put, the cups for a partial band bra are bigger than the cups for a full band bra to account for the channeling being flipped inside rather than outside. To understand this better, let’s walk through the construction process of each. On a partial band bra, the cup seam allowances, which are usually ¼”, are stitched to channeling, which is usually 3/8” (edge to edge, not the internal width). After the channeling has been attached, it is flipped to the INSIDE of the cup and stitched a second time. On a full band bra, the seam allowances, which are the same width as in a partial band, are also stitched to 3/8” wide channeling. After the channeling has been sewn, it is then flipped OUTSIDE of the cup and stitched a second time. Here’s another way of saying it – a partial band has an extra 3/8” built into the pattern to account for the channeling being flipped to the inside of the cup.
So, how do you convert a full band bra to a partial band? Let me show you!
Before I go into it, it’s important to note that this is for a bra that has an upper and lower cup, but the method/concept can be used for other bra styles (i.e. a bra with a vertical seam like the Madalynne X Simplicity 8229).

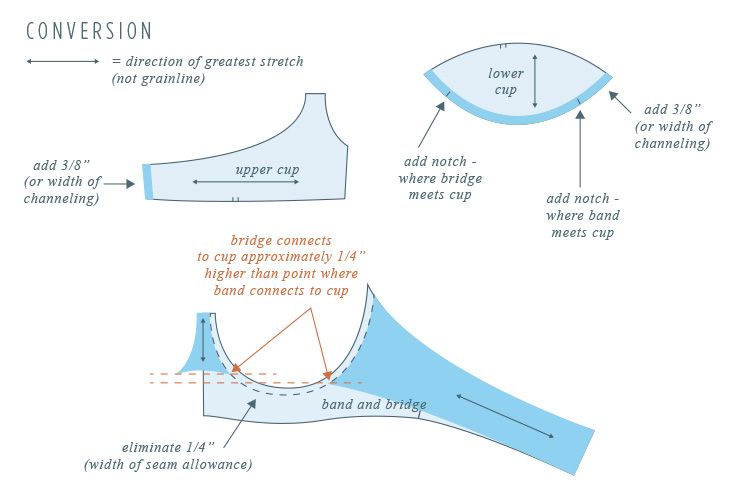
The first step is to add the width of the channeling, which is 3/8″, to the cup seam line of the upper and the lower cup. Make sure that your channeling is 3/8″. In some cases, it could be 1/4″ or 5/16″ and if it is, add that measurement. Also, pay extra attention that you don’t add to the cross cup seam!
Next, eliminate 1/4″ from the cup seam line on the bridge.
After, draw the new bridge shape. I made the pattern into one piece rather than on the fold to make cutting easy. I curved the pattern slightly upwards at center front.
Connect the frame and the back band at the side seam so that they become one pattern piece instead of two. Then, draw the new back band piece. I placed the bottom of the band – where it meets the cups – 1/4″ lower than where the bridge meets the cup for a more flattering look.
That’s it! Well, you might have one more step – to add seam allowances. I didn’t in this tutorial to make pattern alterations easier to understand.
So, why make a partial band bra? There are several reasons, but two main ones are that even though the cups are bigger, the total fabric yardage used is less. Also, because there is no frame under the cups, the band won’t roll up.


